Tips Blog
02/2019 - TIP - FABRIC SIZE CALCULATION
It will soon be time to sing "happy birthday to me", LOL, but first, since we only keep tips for TWO years here's an old tip recycled ... Some stitcher's are confused about "STITCH COUNT", and how the count of the fabric affects the finished size of the stitching. Of course, most know that a smaller stitch will equal a smaller stitching (that's pretty logical), LOL. But how do you calculate the size of the fabric you need for stitching a design?
Yes, most patterns have size recommendations on them - and many (like mine) give you a selection of sizes... but what if you want to stitch on a fabric that isn't on the list... do you know how to calculate the finished size, so you can be sure your fabric is large enough?
Of course, if you're going to a SMALLER count fabric (say 16, rather than 14), if you use the size recommended for the 14ct you'll have more than enough. Just on a side note, have you noticed that everything in needlework is smaller, the larger the number is? Fabric counts (11, 14, 16, 18) because the count is the NUMBER OF STITCHES PER INCH (so, of course, the more stitches you have, the smaller they are!), but needles as well, 24 is smaller than 22, which is smaller than 20, etc. Even floss, #12 pearl cotton is finer than #8, up again to #5, and once more to #3!
Sorry to get side-tracked, <wink>, let's get back to that fabric size. You need to know the size of the pattern in stitches (again, this is printed on the pattern, but if it isn't you can easily count it off, as most patterns are grid in 10 block squares). You also need to know the fabric count. If you're not sure, place a pin or needle in the fabric, right up against one of the vertical woven strands. Measure over 1" and put another vertical pin in place. Now count the number of strands in between the 2 pins.
If you are going to be working over 2 strands, remember to divide the fabric count number in half (for example, 28ct over 2 is the same as 14ct).
To calculate the finished design size use the following formula: stitch count / fabric count = design size
For example, if your design is 42 stitches wide (stitch count); and you divide it by 14 (fabric count); you find that the stitched design will be 3" wide. Repeat the formula to calculate the height. Most stitchers add a MINIMUM of 3" to each side of the design (or 6" to the height and 6" to the width), but you can certainly add more than that.
PLEASE NOTE: if there is white space around the design that you want left showing when the piece is framed, add the amount of space desired to the fabric count before doing your calculations.
Using our example of 14ct fabric, if you wanted an inch of white space showing around the design (say 1/2" on each side), you would add 14 stitches to the 42 stitch width, before dividing by the fabric count. In other words, (42+14) / 14; or 56 / 14, for a design width of 4". Add the 6" framing allowance, and the minimum width of the fabric you should use for your stitching would be 10".
I hope this helps, it really is quite easy. Try a few simple calculations yourself and you'll soon be doing it like a pro! Happy stitching!
01/2019 - TIP - BACK VS RUNNING
Lately I've been creating a lot of 3d designs - which means a lot of joining is required! Some of these designs include my adorable SNOWBALLS & BELLS; the TOP HATS that are so popular; our 3D LOVE & PEACE ORNAMENTS; and our newest BIRDHOUSE ORNAMENTS!
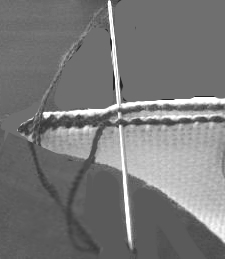
Now I must admit, the birdhouse is assembled over a cardboard base using white glue, LOL, but for the others I've been doing this by outlining each piece with a row of stitching, and slip stitching. So to join two pieces together, we fold the seam allowances to the inside, and lined up the outlining, then slip-stitched through BOTH outline stitches, like this:
But that brings me to today's topic... what is the difference (and which is better), a backstitch, or a double-running stitch? I think they both have their places, and uses, and we're going to look at those right now!
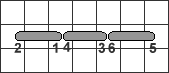
BACKSTITCH: most commonly used in cross-stitch, this outline stitch crosses one stitch on the front, and two on the back, so you are always going 2-stitches forward, 1-stitch back to stitch, like this:
The advantage of this stitch is that that long looping strand across the back of the fabric helps cover needle holes, giving your outlining a smoother look. However, I don't recommend backstitching for a joining outline, BECAUSE that longer loop on the backside makes this stitch a bit looser to work with.
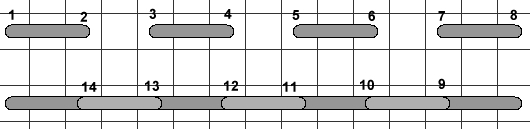
RUNNING STITCH: or more accurately a DOUBLE-RUNNING STITCH solves that problem. Most commonly used in Blackwork, where the object is to make both sides of the fabric look as much alike as possible, a RUNNING STITCH is worked across one stitch, then a stitch is skipped, the next one is worked, the one after skipped, and so on. To complete the pattern, a DOUBLE-RUNNING STITCH comes back down the row just created, filling in the missing stitches, like this (the top row is a running stitch, the bottom one (9-14) is a double-running stitch:
While both stitches LOOK very similar, they meet very different needs, so I hope you enjoy exploring their uses!
11-12/2018 - TIP BLOG - DORSET BUTTONS
Once again you can thank my needlework guild for this months blog! One of the ladies asked me to find her some 'how-to' written instructions for DORSET BUTTONS, and I had such fun researching it, I thought I'd share them with you.
These are basically covered and woven rings, that can be made large or small, and which you can use for actual buttons, or for ornaments, or for earrings! There are some great tutorials on-line, but the one I would recommend is at a website called craftstylish.com, which had clear instructions, with lots of step by step pics.
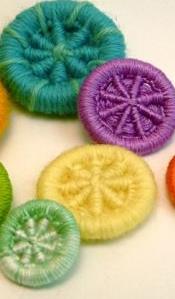
For beginners, a larger ring (1.5 - 2.5") is recommended. You can use 6-strand embroidery floss; pearl cotton or yarn to cover the buttons, so a lot of variety is possible, but we're going to call it YARN here, no matter what you use. The only MUST is that the ring has to be solid - no breaks in it, which is why the curtain rings available from craft and fabric shops are perfect for this. You will also need a tapestry (blunt) needle, with a large enough eye to accommodate your yarn.
I'm going to cover this quickly, so I do recommend following the link above, to see step by step pictures. You want a long length of yarn, so you don't have to add pieces and hide tails. 4X the length of your arm has been suggested, or roughly 100 inches.
Cover the ring very completely with BUTTONHOLE or BLANKET stitches (see my tutorial on this stitch, if it's unfamiliar).
Once there is no ring showing anywhere, and notice that you have a ridge all around the outside edge of the ring. Gently work at rotating the yarn, so that outer ridge is IN THE CENTRE of the ring. The 'tail' of the thread will be dangling down, inside the ring.
Wrap the yarn around the ring several degrees apart, to form spokes. For beginners, start with 8 spokes, though for larger buttons you can add additional wraps. Note that one side will look like a wagon wheel, with nice even spokes, but the other side will have wraps closer to the outer edges.
When all the spoke wraps are complete, turn the button over, so you're working on the side where the wraps are not even (the BACK of the button).
Slide the needle under the two spokes closest to the edge, and give a tug. Pull the yarn to gently tug the off-centre spokes into the centre, and repeat with the other spokes, until the spokes on this side is lined up as well as the FRONT. Note that you will have to hold the yarn tightly until a bit of the weaving is completed.
Flip the button to the right side, and begin weaving by bringing the needle up from the back on the LEFT SIDE of the nearest spoke, and going down on the RIGHT side of that spoke. Pull the yarn snug.
Now move to the next spoke to the LEFT (yes, you are going counter-clockwise, past your starting position - this is what give the 'raised' look to the stitch), again, come up on the left side of the spoke, go down on the right side of the spoke, and move to the next spoke on the left. Repeat until the entire button is covered in weaving, pushing the stitches on each spoke together every once in a while, to be sure they are nice and tight.
When the stitching is complete, run the tails under on the BACK of the button. To attach, simply stitch the centre of the button, to anchor. Enjoy this stitch - I'd love to see what you make with it! Happy stitching...
4/18 - TIP BLOG - FANTASTIC FRENCH KNOTS!
Not sure if I mentioned this, but I'm re-cycling some of my blogs from years ago, as they are still relevant, but getting lost in the growing annals of tips, so hard to find! However, one of the things I hear most often from stitchers, is that they hate doing French knots - they come out misshapen, with loops of thread sticking up, or any number of other imperfections... so it seemed like a good time to tune up and re-cycle a PERFECT FRENCH KNOT tutorial... enjoy...
Actually, French knots aren't really difficult at all, though they can take some practise, as it's a 2-handed job - the trick is in the TENSION. When you come up from the back of the fabric, pull the floss gently but firmly away from the base of the stitch with your free hand, and keep the tension on that strand during the rest of the steps.
Now, I'm right handed, so I'm going to tell you how I work a French Knot right-handed. If you are left-handed, simply reverse these instructions.
Holding the floss several inches from the base with your left hand, and pointing the tip of the needle in the same direction (away from the base of the strand, along the length of the floss), wrap the floss 2-3 times around the needle. Most instructions call for a double wrap, but when I want a larger / thicker knot, or if I'm using very fine floss, I have been known to wrap 3 times.
Keep holding the floss strand firmly taut, while you turn the needle away from your left hand at a 45 degree angle, and slide the needle down the floss until it's almost touching the fabric (see Figure 3 below).
Still keeping the floss taut, so it doesn't loosen and gape on you, push the tip of the needle back down through the fabric to the back. If the floss is fairly thick, you may go back down in the same hole you came up in, and the thick knot will sit on top of the fabric. If the floss is thinner, or the fabric is loosely woven enough that the knot may easily pull through the fabric, then go over one fabric strand from your starting position, before inserting the needle.
Gently draw the floss strand tight, forming the knot, keeping the tension on the floss strand, but allowing the strand you're holding to feed down through the opening, until a small tight knot is formed. Refer to the graphic below if any of this is unclear. I suggest getting a scrap piece of fabric, and practising until you are comfortable making fantastic French knots!

Now, here's a tip you may like even better <wink>. If you really, really, really hate French Knots, you can replace them with seed beads of the same color! This simple trick keeps a uniform size and shape to all 'knots', while giving a very similar look to the French Knots. That's it for this month... talk to you later...
03/2018 - TIP - LET ME NEEDLE YOU!
Well, I was browsing through my BLOG NOTES, a little book I keep handy to jot down things to share with you... and I'm getting near the bottom of the well of things I had noted, LOL, so if anyone has anything they think others would like to know about, please let me know - I'm always looking for inspiration!
This month's tips were inspired by a newsletter from my needlework guild (Quinte Needle Arts Guild, out of Belleville), and offers some tips about needles... here are some of the hilites of that article by Judith Best, along with some thoughts of my own:
There are different types of needles, as most of you know... SHARPS are used for embroidery, and have a sharp tip and long eye, allowing them to ease through tightly woven fabric, like cotton. These are great for surface embroidery. BETWEENS are similar to SHARPS, but shorter, while CHINELE are also similar to SHARPS, but shorter and thicker (they're good for heavier yarns, such as those used in Crewel work).
DARNERS are also like SHARPS, but they are longer, and the eye is not elongated. Being longer, they are great for running stitches, or any 'darning-like' stitch. QUILTING NEEDLES have sharp tips as well, but they are shorter, to resist bending over long periods of use.
TAPESTRY and CREWEL needles are also a bit thicker (like the CHINELE), but they have blunt tips. I tend to use mainly a #24 or #26 tapestry needle myself. When you're using linen or Aida, which is made for needlework, you actually want a needle that WON'T pierce the threads, but will fit in the openings left by the weave of the fabric, so most counted work, drawn thread, pulled thread, or needlepoint etc., are done with this type of needle.
There are even more kinds of needles, but those are the main ones you are likely to run across unless your doing specialty needlework (like the BODKINS used in Swedish Weaving).
Needles aren't (as a general rule) very expensive, so don't be afraid to toss them out! I know stitchers who select a new needle at the beginning of every project. But needles rust, so don't leave them in the face of your work for any length of time, and store them in a dry place. Some stitchers create 'needle books', with felt pages, to keep the different sizes and types of needles together.
To choose a needle, try dropping it (point first) through an opening in the weaving of the fabric. The needle should slip through with the eye barely moving the strands aside. If you use too thick a needle it will make gaps around the base of your stitches, which will look unattractive... but if you're using thick floss (like tapestry wool), or several strands of floss (I like to use 3X myself), then you also want a needle that will make a large enough hole for the thread to pull through the fabric easily! Do a test on an out-of-the-way area, or scrap, to ensure the needle you've selected is right for both the fabric and the floss.
Judith's final admonition is to always purchase good quality needles, LOL... happy stitching!