Tips Blog
TIP - BUTTONHOLE HOW-TO
It was pointed out to me recently that I've been doing this blog for several years now, and that there are a whole new group of stitchers reading it now, who might not go back through years of tips, and that I should start re-cycling some of the better tips, to move them up the blog list. So I decided that might not be a bad idea, and since I use it a LOT, I thought I'd start with a very useful finishing stitch that is good for more then just Hardanger - it's great for afghans, bellpulls... anywhere you need a finished edge (rather then framing a piece), but don't want to hem. I have also updated my instructions, and (hopefully) made them easier to understand.
This will be a 2-part lesson, so in this blog I'm going to explain how to work a Buttonhole Stitch (also known as a Blanket Stitch), and next month I'll tell you about a little trick for beginning and ending strands when working this stitch - so be sure to come back for that, as it's an easy (but little known) technique that will make using this stitch even simpler!
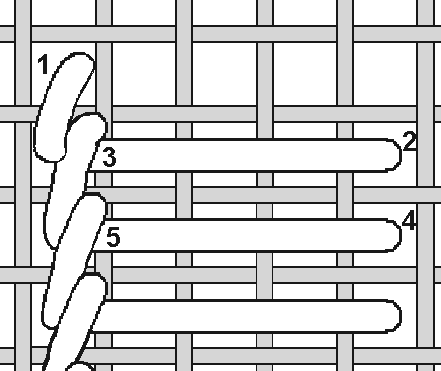
BUTTONHOLE or BLANKET stitch is quite easy to do, and can be worked from right to left, or left to right (our diagram shows right to left), however, whatever way you begin, you must continue all the way around the project in the same direction!!
Work across 3-4 fabric strands, because this is an anchoring stitch, preventing the edge of the fabric from unraveling. Begin with what is called a WASTE KNOT - another Hardanger technique that's useful for more than Hardanger! Start by making a knot in the end of your first stitching length. Push the needle down through the FACE of the fabric, at least a 6" away from the area you will be stitching. The object is to leave a long enough tail to run under later. Once you finish stitching with the first length, go back to the beginning, cut off the knot (waste it - get it, LOL?), pull the tail to the back of the fabric, thread it through a needle and run it under. Remember to check out BUTTONHOLE CONT'D next month, for more tips on beginning and ending tails!
Come up in the starting position (#1 on the diagram), but you'll actually work the stitch over one fabric strand (in the NEXT stitch). Note that you can work to the right or left, but once you begin you must complete the whole edge in the same direction. Push the needle down at the bottom of the stitch (#2 on the diagram), with the tip of the needle coming out at the top of the stitch (#3 on the diagram), and slipping THROUGH the loop of the floss (made by 1-2). Gently tighten the strand coming out of the fabric, so it pulls firmly in place but doesn't distort the fabric (refer to the diagram). Using the thumb of your opposite hand, hold the floss strand against the fabric, pulled out of the way and taut (but not too tight), while you repeat steps 2-3 (see 4-5 on the diagram). Work over every fabric strand, or every other strand, depending on the weight of the floss being used.

To turn corners, there are 2 things to remember... for INSIDE corners, simply move 45 degrees, and work the stitch as above, SHARING a corner hole (see the diagram below). OUTSIDE corners have 3 extra stitches worked around, stepping over 2 fabric strands vertically for the first stitch, over 2 more vertically to the corner, and then over 2 fabric strands horizontally for the 3rd stitch. ALL of these stitches share the corner hole of the last individual buttonhole stitch. Move over 2 more fabric strands and continue working individual buttonhole stitches, (generally in groups of at least 5). Note when turning an outside corner, that FIVE STITCHES will share the same inner corner hole, while the stitches step down and around the corner across 2 fabric strands (as shown on the diagram below). TIP: Never begin or end a floss length on a corner. If necessary, change the floss before the corner is reached.
Here's a bonus tip for you... if you strip excess fabric strands from the long side of your fabric (for the longest stitching lengths), your stitching will be almost invisible, since the 'floss' is the same as the fabric! Remember to come back next month, and I'll tell you how to do invisible beginning and ending of strands. Happy stitching!