Tips Blog
TIP - BACK VS RUNNING
Lately I've been creating a lot of 3d designs - which means a lot of joining is required! Some of these designs include my adorable SNOWBALLS & BELLS; the TOP HATS that are so popular; our 3D LOVE & PEACE ORNAMENTS; and our newest BIRDHOUSE ORNAMENTS!
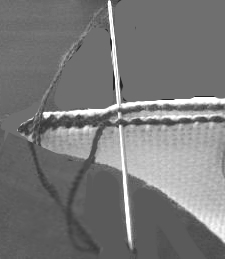
Now I must admit, the birdhouse is assembled over a cardboard base using white glue, LOL, but for the others I've been doing this by outlining each piece with a row of stitching, and slip stitching. So to join two pieces together, we fold the seam allowances to the inside, and lined up the outlining, then slip-stitched through BOTH outline stitches, like this:
But that brings me to today's topic... what is the difference (and which is better), a backstitch, or a double-running stitch? I think they both have their places, and uses, and we're going to look at those right now!
BACKSTITCH: most commonly used in cross-stitch, this outline stitch crosses one stitch on the front, and two on the back, so you are always going 2-stitches forward, 1-stitch back to stitch, like this:
The advantage of this stitch is that that long looping strand across the back of the fabric helps cover needle holes, giving your outlining a smoother look. However, I don't recommend backstitching for a joining outline, BECAUSE that longer loop on the backside makes this stitch a bit looser to work with.
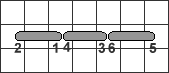
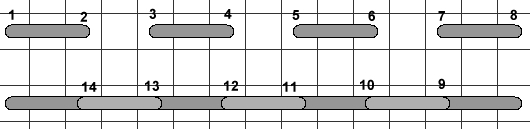
RUNNING STITCH: or more accurately a DOUBLE-RUNNING STITCH solves that problem. Most commonly used in Blackwork, where the object is to make both sides of the fabric look as much alike as possible, a RUNNING STITCH is worked across one stitch, then a stitch is skipped, the next one is worked, the one after skipped, and so on. To complete the pattern, a DOUBLE-RUNNING STITCH comes back down the row just created, filling in the missing stitches, like this (the top row is a running stitch, the bottom one (9-14) is a double-running stitch:
While both stitches LOOK very similar, they meet very different needs, so I hope you enjoy exploring their uses!
TIP - BACK TO BASICS
As I'm teaching and talking with stitchers, I am always surprised by the number of little tips that are new to even the most experienced stitchers... even me! Check out the April/2017 tip, to see how I picked up a technique for working continuous quarter stitches which makes my work look much better - I firmly believe there's always something new to learn.
So I thought that I would take a moment to explain a few of the 'basics', and maybe even the why behind them.
First of all, before you even begin stitching consider your materials. For example, is your fabric large enough to allow for framing or finishing? Since dyes can vary from dye lot to dye lot, have you purchased enough floss to complete the project - better to be generous than sorry! Have you chosen a project you will enjoy stitching, which isn't too difficult for your skill level, even if it provides a slight challenge to increase that level?
Second, make a 'working copy' of the pattern - most designers do not mind this, as long as all copies are destroyed once the project is stitched. A copy allows you to mark off each row, or section, as it is stitched, so you always know where you are working. Another good idea is to put a marking pin, safety pin, or small piece of floss to designate the TOP of the stitching until enough is completed that you can see which way is up <wink>. This can be especially important if you are working on something like a topper or tree skirt, where you work around a circle. You want to keep the fabric in the same position and turn the pattern, so that you're stitching faces the same way down the entire piece. If you turn the fabric or trust me, it will look horrible!
Third, now you're ready to stitch, check out the July/2017 tip to learn about LOOP STARTS, if you don't already know about that cool technique ... for now, just let me say that it is very important to make sure all tails (both beginning and ending) are well secured, or they will come loose - usually showing through after the piece is framed, which is VERY annoying! If the item will get some wear - like a topper or tree skirt, then I suggest running the tail in 2 directions. In any case, be sure all tails run AWAY from the edge of the stitching, again so they don't show through the fabric (this is my pet peeve when people do model stitching for me, LOL, NEAT EDGES AND TAILS PEOPLE!
Fourth, while some stitchers cut their fabric with a 3" allowance on each side and begin stitching 1.5" in and down from a corner; if you begin stitching in the centre of your fabric, working out from the centre of your pattern, and then the finished stitching will always be centred, and allow an equal fabric allowance all the way around!
Fifth, when stitching, be sure you wash your hands before starting, keep pets away from your work, and remove the hoop after each stitching session. All of these things will keep the fabric clean. Once the project is finished, wash in mild dish soap and cool to warm water, and rinse well; finally place the stitching face down on a clean towel, and press from the back with a hot dry iron. Lift the iron and move it around the stitching until the fabric and floss are fairly dry. Pressing from the back (and using a towel), allows the stitching to raise off the fabric and become more prominent. I generally let the piece sit overnight after pressing, to be sure it's completely dry before mounting and framing.
Sixth (and the last tip I'm going to pass along), let's talk for a bit about floss. There are so many kinds! Shiny, fuzzy, over-dyed... some of which require delicate handling. Sometimes the best thing you can do is just use shorter lengths (like with Kreinik blending filaments). Sometimes a different technique is needed - for example, when working with either a fuzzy floss or over-dyed floss, you generally want to complete BOTH legs of each stitch as you work across the row.
In the case of fuzzy floss, you do this because it IS fuzzy, and it can be hard to see where you want to stitch on the way back across the row.
With floss that changes color, using the same technique (working both legs of each stitch) allows the color changes to flow through the design. If you worked the bottom leg across the row ( / / / / ), then the top leg back across the row (to form an X - XXXX), you would get a mottled look, as the color changes would be different on top and bottom. However, that might be a great look for say, a treetop!
That's it for this month... keep learning!
TIP - MAKE STITCHING EASIER
A while ago (like 5 years, LOL), I gathered together an assortment of stitching tips provided by stitchers, that can make our stitching lives easier. Since we have reduced the number of blogs we keep on the site, some great information has been cleared off... so I'm gathering the best of the best, (GBG), and sharing them with you again.
So... let's talk about SCISSORS! I know I love mine, and woe betide the hubby who thinks he can grab my fabric scissors to cut the rope on the chicken!! They needn't be expensive as there are a lot of good quality scissors at reasonable prices, but ensure they are used for stitching only - never to be used on paper! The ends will stay nice and sharp if they only cut fibres and you won't have any chewed or frayed ends at the back of your stitched piece. Why shouldn't the back look nice, too?!" (FYI, we carry a line of very nice scissors for only $15 or less)!
And we all know how important a good LIGHT is, and if it has a MAGNIFIER, even better! Now I tend to watch tv when I stitch, but found it hard to do with my bifocals - I generally remove my glasses to stitch (don't need them for close work, but need them to watch tv) ... so either my DH had to tell me what I just missed, or I back up the PVR to see it (LOVE my PVR!). Anyway, I don't want to turn this blog into a commercial, LOL, but once I started using the fantastic light with magnifier (that we sell), I am delighted to report that the magnifier makes it possible to keep my glasses on while I stitch... so I can now watch tv too! The only problem is, I love my light so much I can hardly stitch w/o it now, ROFLOL.
One more suggestion about lights... keep the lamp on the opposite side of your stitching hand (so if you're right handed, put your light on the left), that way you avoid casting shadows on yourself...
OK, let's talk a bit about STORAGE ... try using a clean pillowcase to store the project you're working on in, to keep everything clean and dust free! I might add that if you have several projects on the go, you could put the pattern picture in a plastic bag, clip it to the pillowcase with those big black bulldog clips, then use the clips of the bulldog to hang each project on a hanger in the closet - voila, your 'in progress' projects are stored away, easily accessible, and instantly organized!
Remember, it's not a good idea to store HAND-DYED materials (fabric or floss) in plastic bags. There can be a chemical reaction between the dyes and the chemicals in the plastic, damaging the items stored inside. I have also heard that if you seal the plastic bag it can cause hand-dyed items to 'sweat', again damaging them, but I've never seen this happen - if you have, I'd love to hear about it.
Now, I know I just told you not to store hand-dyes in plastic bags, but now I'm going to tell you how you can store DMC in plastic bags... though I still wouldn't seal them, in case of sweating and color bleeding. If storage is an issue sort floss in bags marked 100's, 200's etc. When you need a color you know where to find it. And I must admit we store our surplus floss this way, packed in a box that goes to tradeshows for re-filling our DMC drawers - though again, we don't seal the bags.
When we were talking about storage containers (a while ago), I mentioned that I love the small plastic Ferrero Rocher containers (I think it holds 12 chocolates), because they are JUST the right size for Mill Hill bead packs. Of course you can store other things in them, why not glue a piece of magnetic tape on the inside of the lid to hold needles, then put floss and scissors in for handy storage. Try an Altoid tin (again with magnetic tape inside the lid) for a little travel case!
Need to store patterns? Why not put them in those plastic page protectors and puts them in a binder! They can be sorted by type (ie wedding samplers, birth announcements) or by designer (bet X's & Oh's! is the only X, LOL). Along similar lines... there are plastic magazine holders you can buy (to store magazines, obviously, LOL), which are simply binder ring strips that the magazine slips through - and would also work for leaflet style patterns. And any style/size of chart can be stored easily.
OK, so here are some actual STITCHING tips... first, if your piece has a lot of orphan stitches, use a hiliter and put a dot of color on the pattern, for each stitch, so they stand out. Color them in with a different color as you stitch. I know from my own experience how easy it is to miss those stitches, so I personally like this tip a lot!
And here's another great idea - if you know you're going to be sitting around somewhere (like a Doctor's office), work an area of you stitching in half-stitch, then while you're waiting you can just go over the half-stitched area and finish stitching it, w/o needing all the floss and chart etc. This is especially useful for background or borders - what a great idea!
Whew, that's a lot of tips in one blog, LOL, hope you found something useful! Happy stitching...
09/2019 - TIP - FRENCH KNOT
This month's tip is short and sweet - and I may have mentioned at least part of this tip before... but one of the things I hear most often from stitchers, is that they hate doing French knots - they come out misshapen, with loops of thread sticking up, or any number of other imperfections.
But actually, French knots aren't difficult at all - the trick is in the TENSION. When you come up from the back of the fabric, pull the floss gently but firmly away from the base of the stitch, and KEEP TENSION on the strand during the rest of the steps.
Now, I'm right handed, so I'm going to tell you how I work a French Knot right-handed. If you are left-handed, simply reverse these instructions.
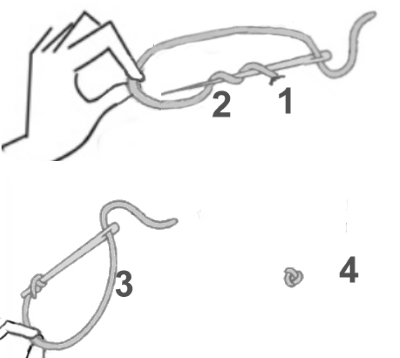
Holding the floss several inches from the base with your left hand, and pointing the needle in the same direction, wrap the floss 2-3 times around the needle (away from the base of the strand, along the length of the floss (1-2 on the top diagram, below). Most instructions call for a double wrap, but if you want a larger / thicker knot, or are using a very fine thread, then wrap 3 times.
Keep holding the floss strand firmly taut, while you push the needle back down through the fabric (3 on the bottom diagram). If the floss is fairly thick, you may go back down in the same hole you came up in, and the thick knot will sit on top of the fabric. If the floss is thinner, or the fabric is loosely woven enough that the knot may easily pull through the fabric, then go down one fabric strand over from your starting position (this strand will catch the knot, and prevent it pulling through to the back of the fabric).
Gently draw the floss strand tight, forming the knot, allowing the floss strand you're holding to feed down through the opening, until a small tight knot is formed. Your knot should look like diagram 4, below.
Now, here's a tip you may like even better <wink>. If you still really, really, really, hate French Knots, you can replace them with seed beads of the same size and color! This simple trick keeps a uniform size and shape to all 'knots', while giving a very similar look to the French Knots. That's it for this month... talk to you later...
TIP - GOOD IDEAS!
Here are some odds and ends of tips I've had kicking around, that you might find useful... hope there's something you can use, LOL...
First of all, have you ever been working on a large piece and just feeling like you've stitched for hours and have made no progress? Someone mentioned this to me recently, and here's what I suggested... change the color of the hiliter you're marking your stitching copy with! It's a simple little trick that let's you see how much (or how little) you've accomplished during any given stitching session, and it only takes 2-3 colors to show you that yes, you really ARE making progress.
But perhaps you're having trouble following your rows... magnetic boards and strips are good for this, but for something easier, and cheaper, why not use POST-IT NOTES!! They are sticky, but moveable, and can be used to mark off areas as well as rows!
Next, if you're having trouble keeping track of beads or charms - maybe some left over from a past project, that you want to keep and use another time. I know we've talked about storage ideas before, but this is still my favorite for charms - tuck them into small containers (I like the metal EXCEL MINT tins, but film storage containers work well too). Tape or glue on of the charms to the outside of the container, and line them up on a shelf (or pack them away in a box, with the charm side up), and voila, no more misplaced charms! This works for beads too, though if you're using Mill Hill beads, I find their plastic packaging tucks quite nicely into empty DeRocher chocolate containers - what a great excuse to eat a dozen yummy goodies (wink).
But here's my favorite idea this month... pick up a little notebook at the dollar store (one that fits easily in your purse), and make a note of the title and designer of any designs or kits you'd love to have. Then, when friends or family ask you for ideas for Christmas (coming up soon!!), or birthdays, you'll be prepared!
Happy stitching, and I'll talk to you next month...