Tips Blog
TIP - BULLION KNOT
The hardest thing I have found about Bullion Knots is that the instructions I found in many needlework stitch books didn't stress the importance of tension, or show you how to achieve it. Some time ago I saw a demo of the perfect way to do this stitch in 7 easy steps, so I'd like to share it with you this month.
Follow the quickie diagrams I whipped up (below), LOL, as I walk you through the steps.
Each stitch will have TWO positions that you need to know before you begin, a starting (A) and ending (B) point, with space in between. For the sake of this explanation I'll call A (TOP) and B (BOTTOM), but this stitch can just as easily be worked side to side (or turn the fabric so the stitch is oriented the same way as the diagram, if that's easier to follow).
Do not use a hoop when working this stitch, as you want to be able to 'scoop' the fabric at the beginning.
For best results, use a needle that is the SAME WIDTH from the EYE to the TIP (such as a Milliner's Needle).
Ready? Let's go!
1. Come up from the back of the fabric in the bottom (B) position. Hold the floss out of the way with your thumb.
2. Push the tip of the needle down in the top (A) position, then using a sewing motion, bring the tip back out the SAME HOLE you started in (B). DO NOT pull the needle through the fabric, leave it in place, from A to B.
3. Put your left thumb over the top of the needle (and the top (A) position), to hold it firmly in place, and with your right hand, wind the floss CLOCKWISE around the needle at least 7 times (if covering a space 2-3 stitches wide). Note that less wraps will make a stitch that will lay flat against the fabric, while more wraps will produce a humped stitch (like a caterpillar walking). You can wrap 10, 15, or even 20 times! The wraps s/b firm, but not too tight - remember you have to pull the needle and floss through them!
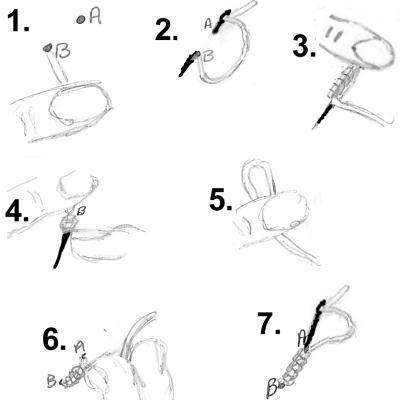
4. Keeping tension on the wrapping thread, use your thumbnail to gently push the loops down the needle, so they are sitting close together right by the fabric, at (B), the bottom hole the needle is coming out of. The wraps should stay SIDE BY SIDE, and not bunch up on top of each other!
5. Now move your left thumb, so it is on top of the wrapped portion of the needle, and with your right hand, gently pull the needle, and the end of the floss strand, so that the entire length of the strand is pulled through the wraps. NOTE: THE MORE WRAPS YOU HAVE, THE HARDER IT IS TO PULL THE NEEDLE THROUGH - be sure your wraps aren't TOO tight.
6. Move your left thumb, and with your right hand lift the wrapped floss strand towards the top (A), making sure the wraps stay tight together. If there is any part of the strand that HASN'T been pulled through the wraps, carefully ease the remaining length through the wraps. If you find you have pulled it too tight (and the holes are distorted), put your needle under the stitch and gently work it back and forth to pull some of the floss back in to the wraps. Again, the more wraps you have, the more hump your knot will have. With 7 wraps, the stitch should lay fairly flat.
7. Push the tip of your needle back down at the top (A) hole, and either anchor the stitch, or move on to the next starting position - or both! TIP: Anchoring the back before working another Bullion Knot will keep the first knot from pulling out of shape when you tug on the second one.
Didn't I tell you that was easy? If you want to see this stitch in action, there is a beautiful demo video on Youtube, and watch a wonderful stitcher make 9 wrap bullions, and more. She does a slightly different technique, so she can use a hoop, giving you another option! Do a search for BULLION FLOWERS, and find out how to make roses and all sorts of flowers with the simple stitch... Till next month...